HikCentral

How to Use HikCentral Professional Software?

What is HikCentral Professional Software?

HikCentral Professional is a centralized video management software (VMS) developed by Hikvision. It provides a platform for monitoring and managing video surveillance systems, including IP cameras, NVRs, and DVRs. Video, Access Control, Attendance, and more are available on Hikvison's HikCentral Professional Series. In addition, the application modules for the different platforms have the same interface design, reducing the learning curve for each.

Buy the HikCentral Professional Licence here:

How to Use HikCentral Professional Software

Before we dive in details on how to use the HikCentral Professional Software step-by-step, the general steps on how to use HikCentral Professional Software are:

  1. Install the software on a computer with sufficient hardware specifications.
  2. Connect the cameras to the network and add them to the system through the software.
  3. Configure the cameras, door access readers, etc and set up the rules.
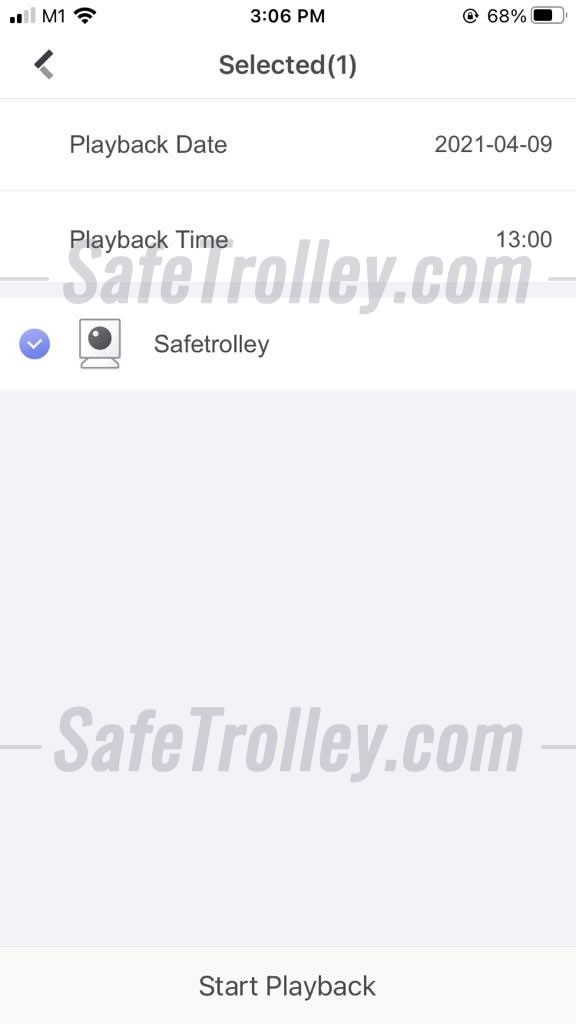
  4. Monitor live video and playback recorded footage.
  5. Manage door access alarms, events, and notifications.
  6. Access the system remotely through a web browser or mobile app.
  7. Manage user accounts and permissions.

With the above in mind, let us get started!

How to Use Login to HikCentral Server

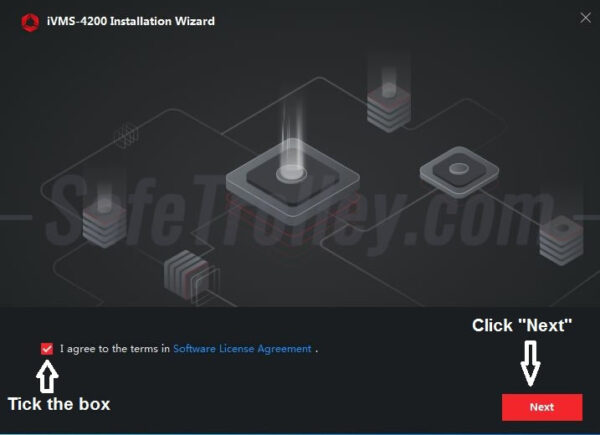
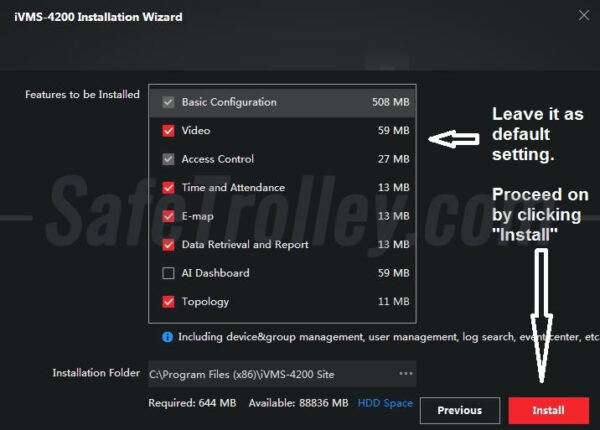
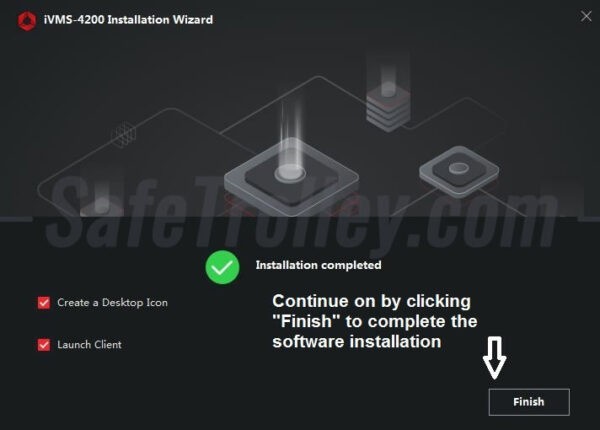
Install HikCentral Professional Software: Make sure the software is installed correctly on your server.

Find Server IP Address: Locate the local IP address of the server where you installed the software. In this example, the IP address is 192.168.10.128.

Open Web Browser: Launch a web browser on any computer connected to the same network as the server.

Enter IP Address: Type the server's IP address (for example: 192.168.10.128) into the browser's address bar and press Enter.

Access Login Page: You will be directed to the HikCentral Professional login page, where you can enter your credentials to access the software.

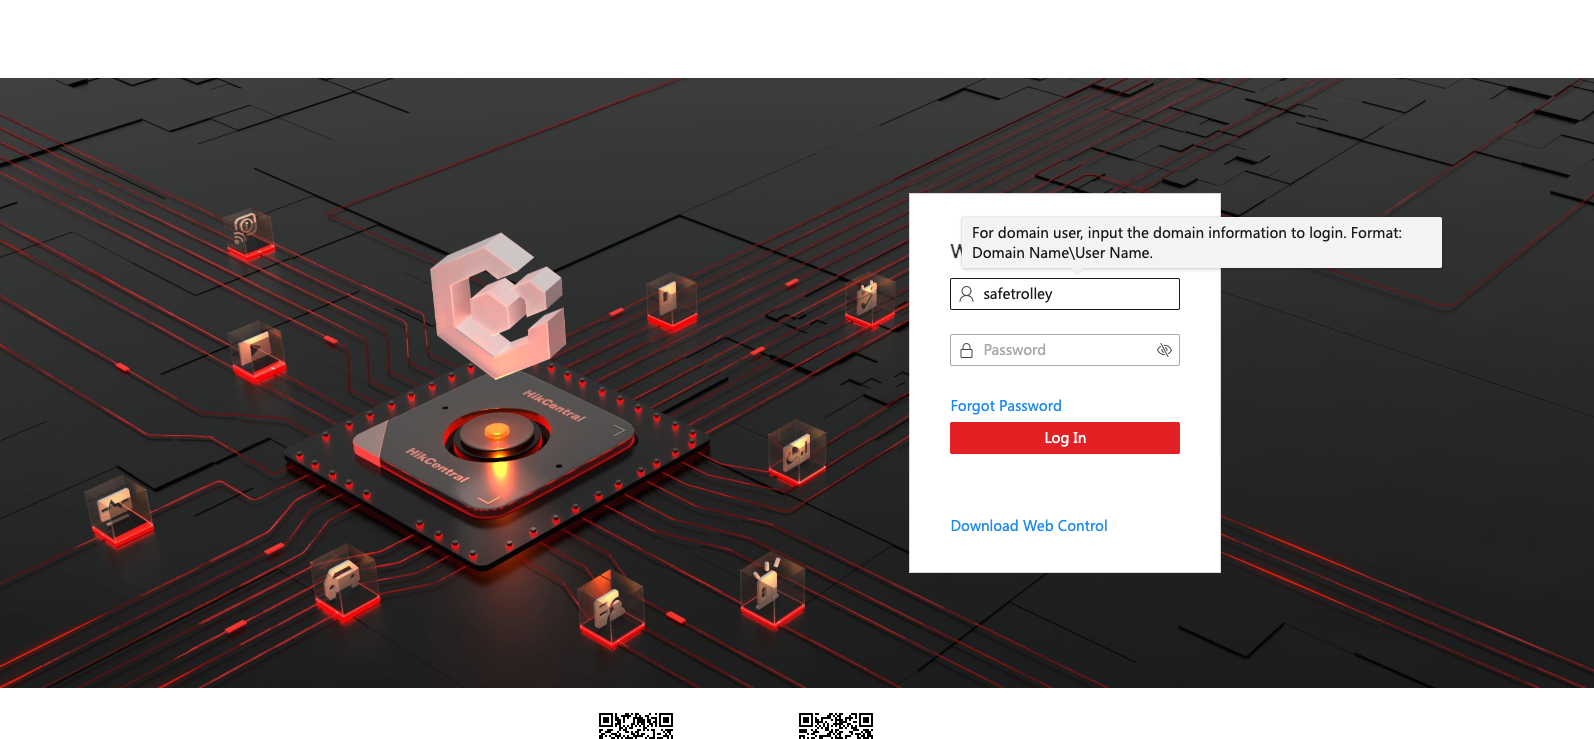
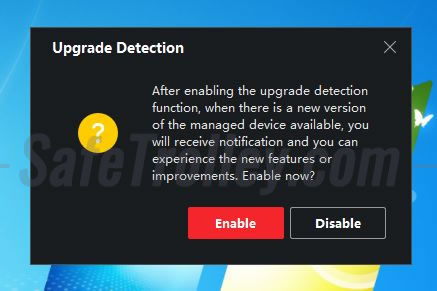
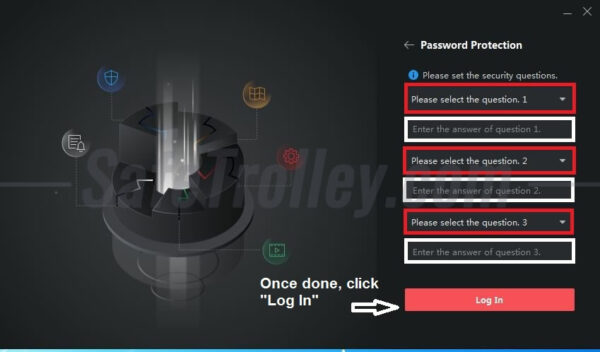
If you login for the first time, you will be asked to create a software account. You can follow the onscreen instructions and do that accordingly.

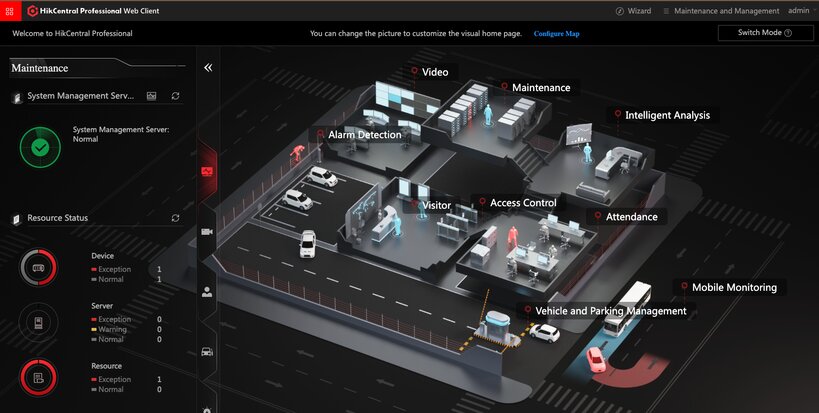
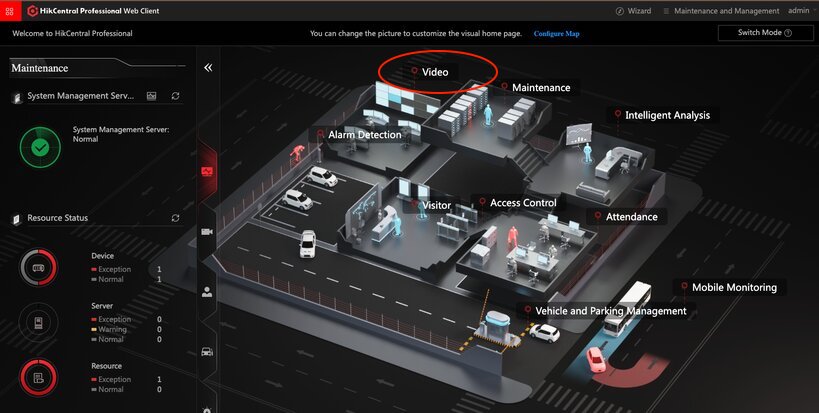
After login, you will see the interface similar to what you see below.

How to Enter HikCentral Professional Software Licence

Click "Maintenance and Management", followed by "Enter Licence" / "Update Licence". This is where you should enter the licence to activate the software.

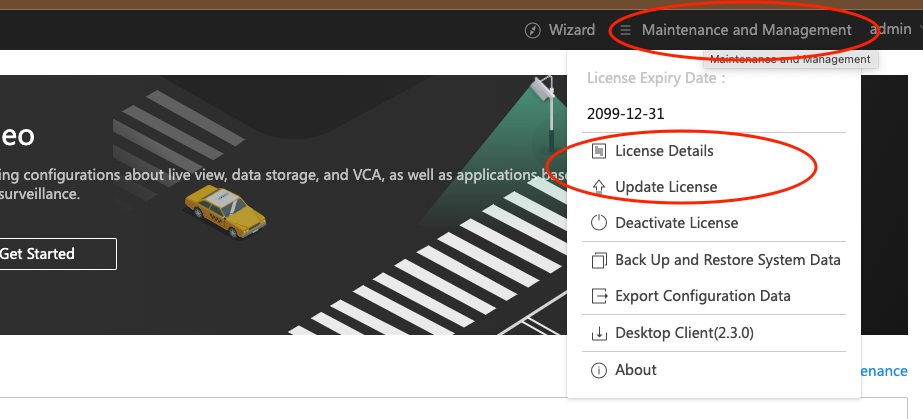
If you don't have any licence, you can purchase one from us.

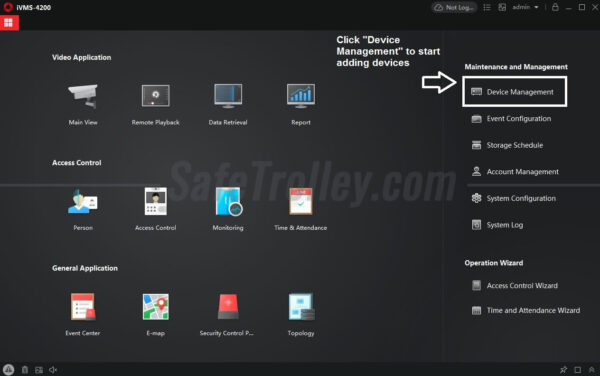
How to View Hikvision CCTV on HikCentral Server

Click "Video" on the main page. It will bring you page as follows:

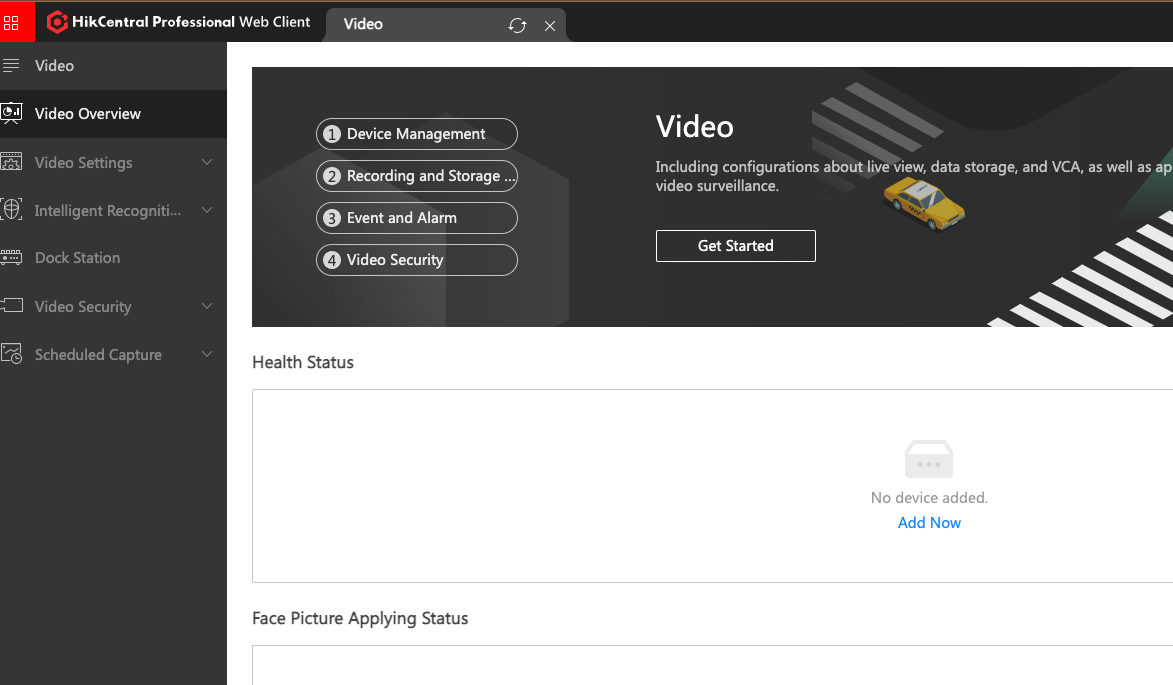
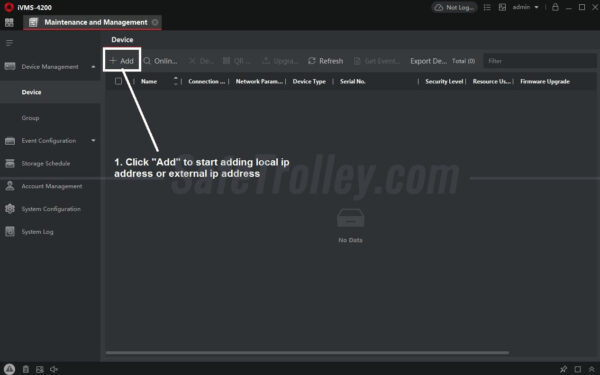
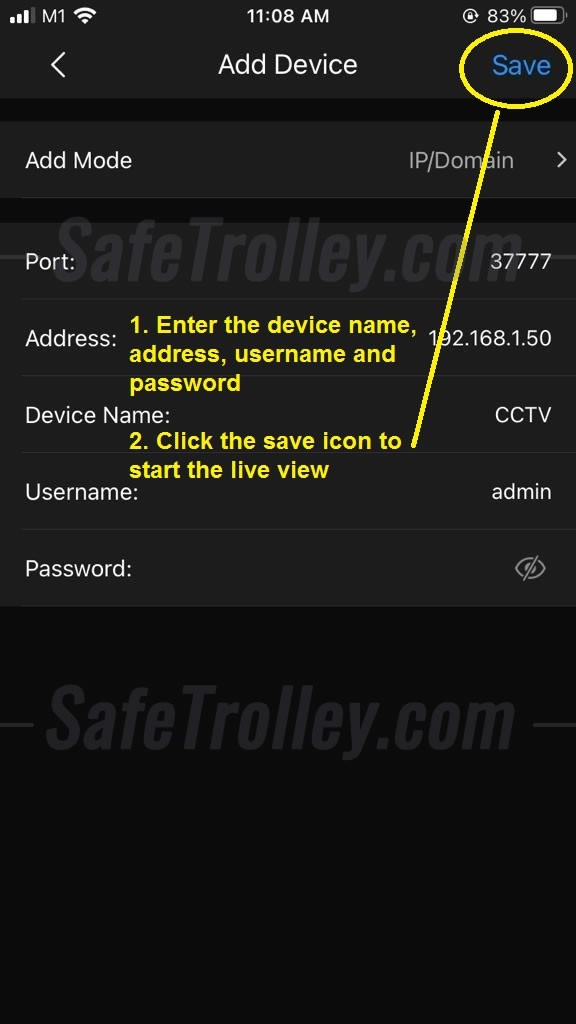
Click "Device Management" to add the Hikvision CCTV device to the server which has HikCentral Professional Software installed.

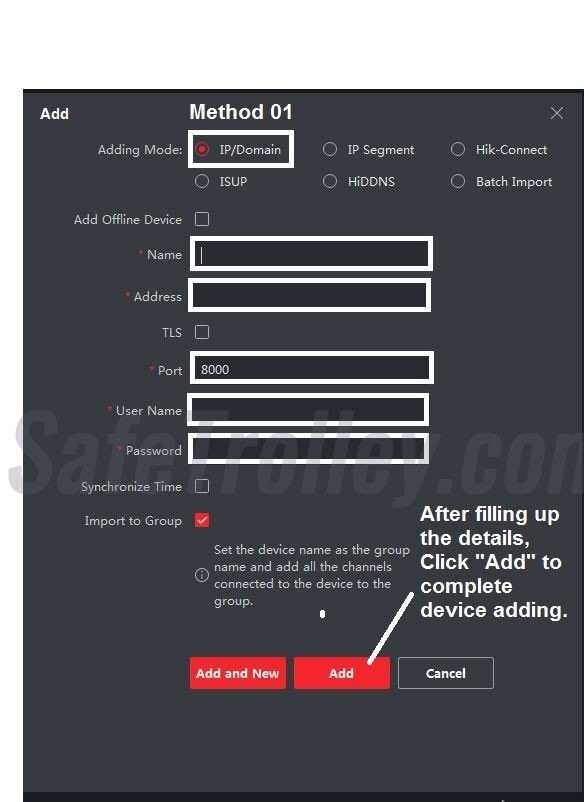
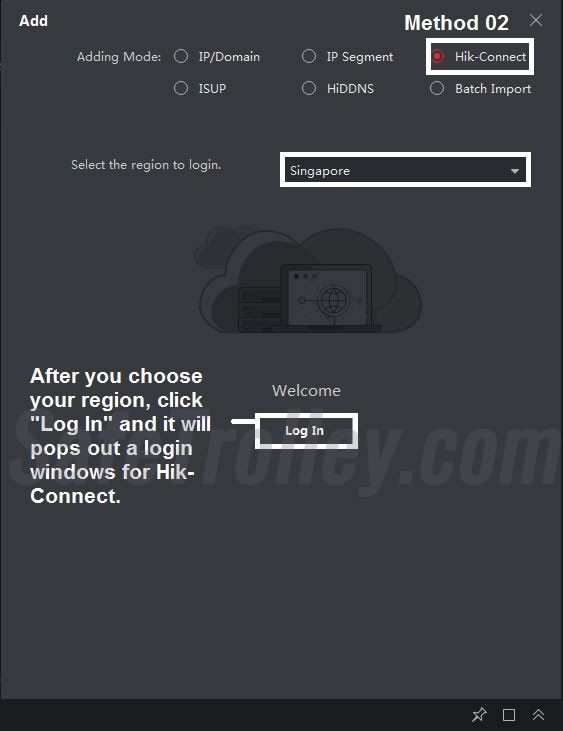
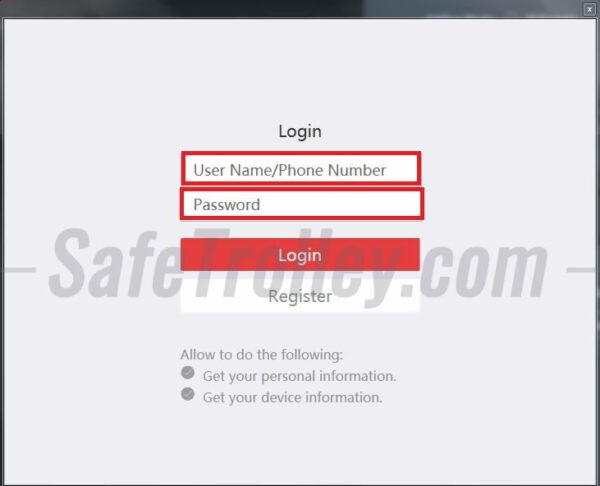
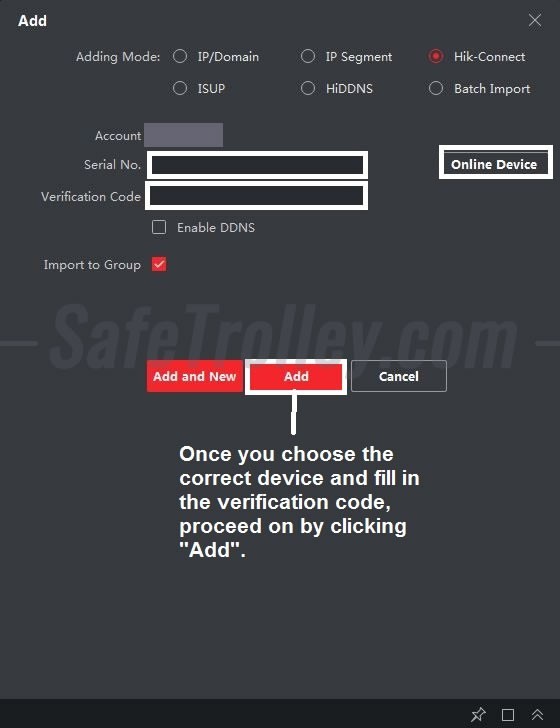
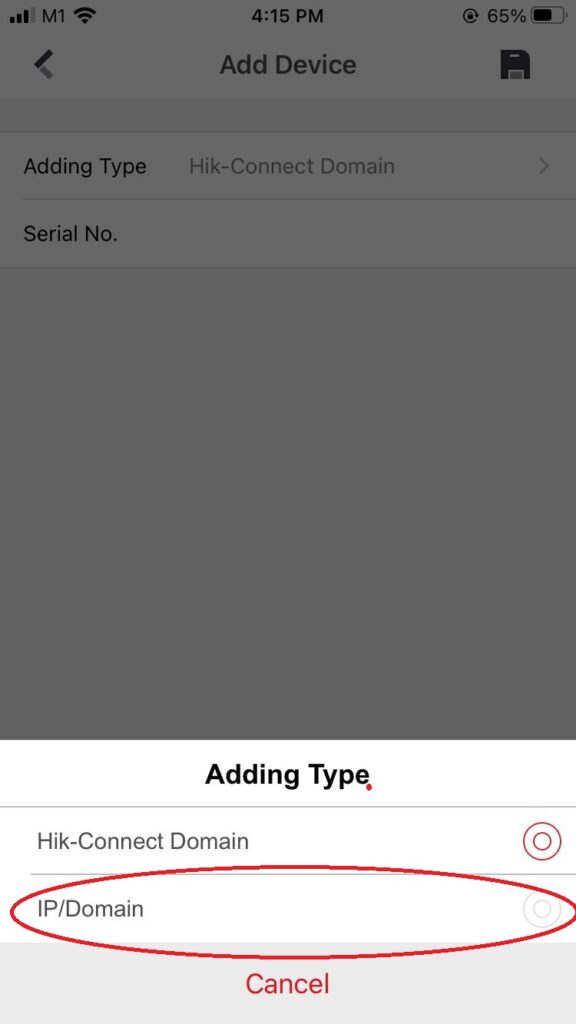
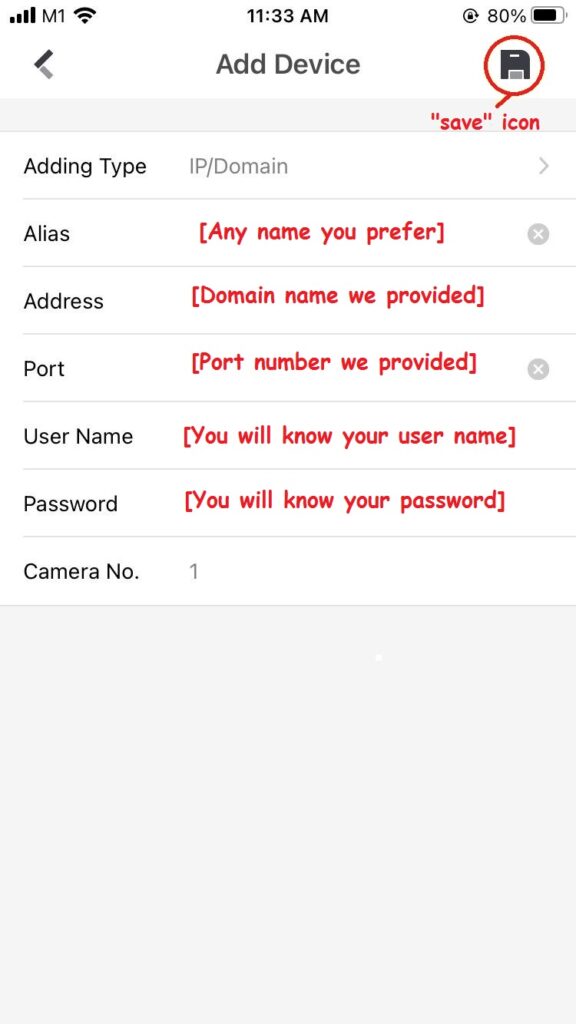
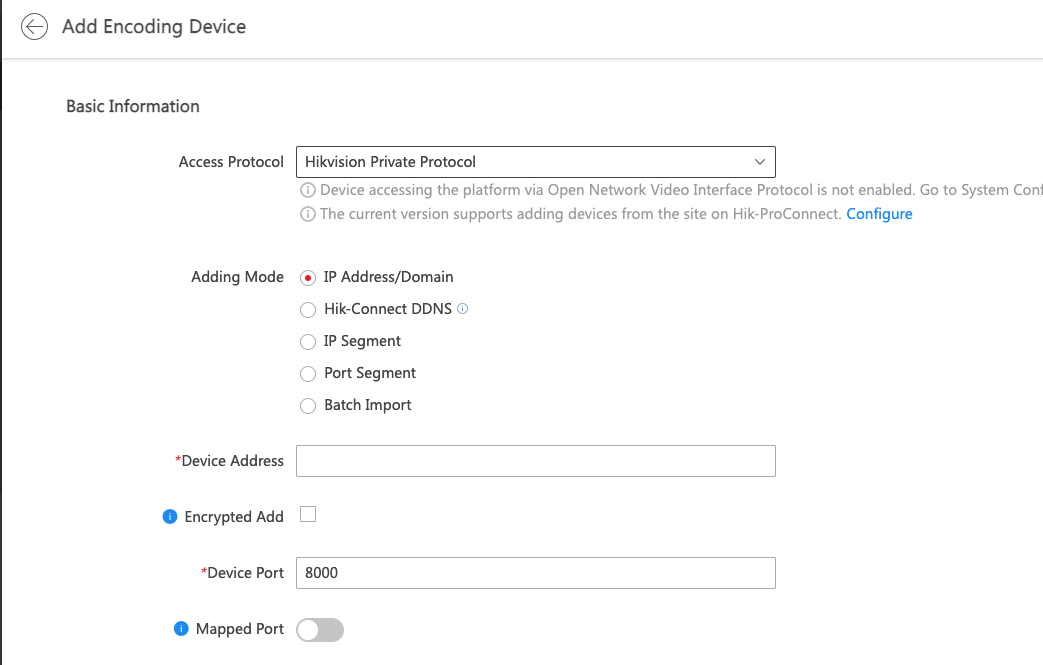
Add the CCTV device accordingly. Remember to select the correct "Adding mode".

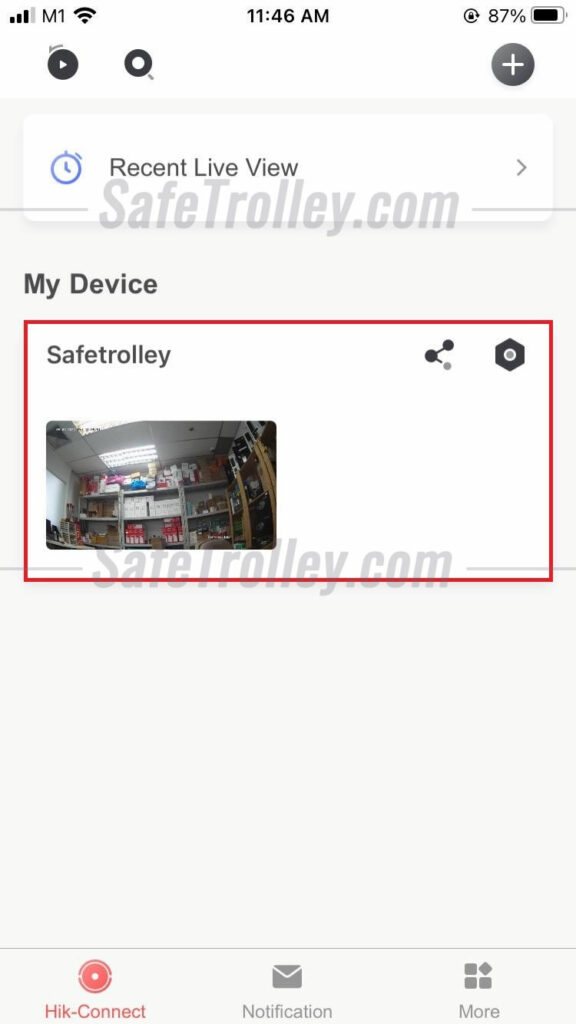
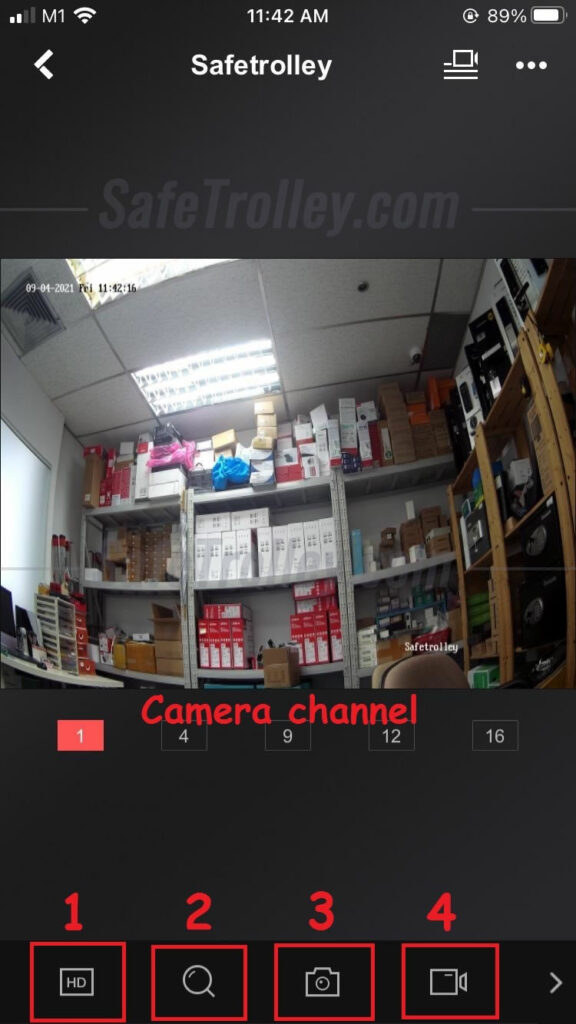
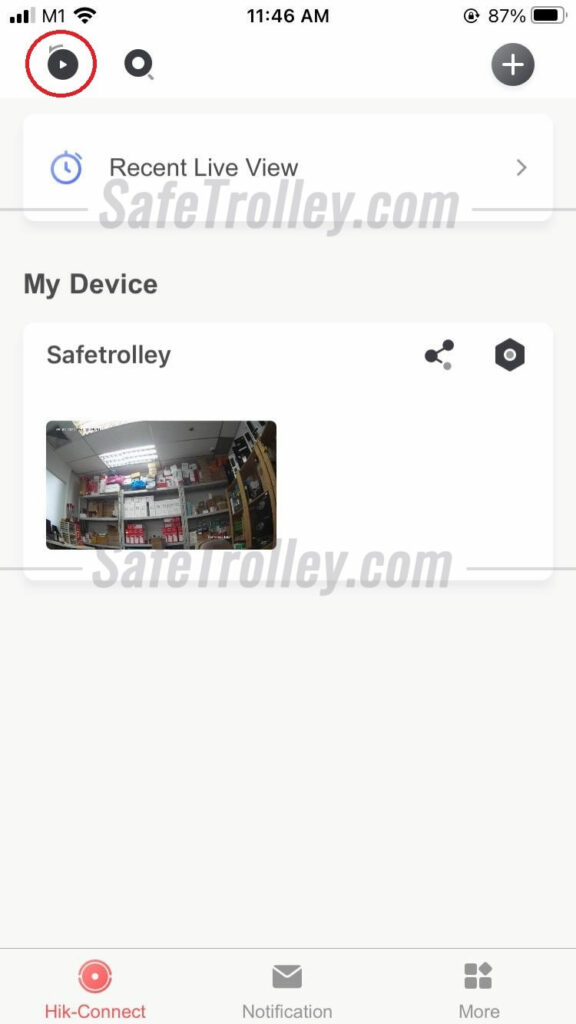
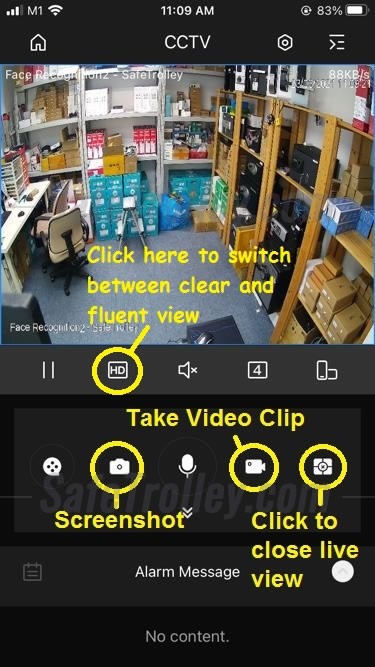
Now, in order to see the live view, click the "Video" tab, followed by "Video Security", and select the cameras to view.

All set now!

We will show in the next guide on how to use the Hikvision Door Access systems on HikCentral Professional Software. Stay tuned!

How to Use the Latest Version of Hikvision iVMS-4200 (V3.x)

Time needed: 5 minutes


Hikvision iVMS-4200 Client is the free version of the management software which allows for real-time live viewing, video recording, and event management of embedded network surveillance devices, such as DVRs, NVRs, IP cameras, Door Access Reader and Controller, Video Intercom system and other encoders. It also supports the time attendance reporting and door access records tracking function.

Refer to the below steps on how to use it.

  1.  How to Use IVMS-4200 Client on PC

    Download the latest version of iVMS-4200 Client here. After that, install the software and run the program to start the software installation.

  2. iVMS-4200 Installation Wizard feature

    You will see this page full of features but you just leave it as default. Continue by clicking Install.

  3. iVMS-4200 Installation Wizard Completion

    You will see this page showing you that you have already installed the software on your pc. Now click Finish to let it run the software.

  4. Software Upgrade Notification

    Choose "Disable" here.

  5. Software account creation

    You will be asked to create user name and password. Note that the password is only for the iVMS-4200 Client software (not for the Hikvision NVR/DVR/IP Camera). So, feel free to set any iVMS of your own. Also, if it's your own PC, you can enable the Auto-Login feature to bypass the login page when you open the software.

  6. Security Question for Password Protection

    You will be asked to set answers to the security questions. The security question will be useful when you reset the password of the iVMS-4200 Client software (not the Hikvision NVR/DVR/IP Camera). Please set your own answers and remember them.

  7. iVMS-4200 Client Main Page

    After you clicked the Log In, it will direct you to this page. Click the Device Management on the right side as shown below.

  8. Device Management

    You can see the "Add" under Device category. Click "Add" to start adding your device address manually. There are two types of adding methods. You may need to check with your system vendor on which method is suitable for you.

  9. Device Adding Method by IP/Domain

    Select IP/Domain as adding mode. After that, fill up the details provided to you or you can refer back to your previous device/ PC. Once you filled up, you can click "Add" to finish the device adding.

  10. Device Adding Method via Hik-Connect

    Select Hik-Connect as adding mode. After that, choose your own region. Click "Log In" once you done choosing and it will pop out a login windows.

  11. Hik-Connect Login Windows

    Username/Phone number(Recommended method, easier to remember).
    a. If login via username, kindly note that the username is not your recorder username. The username is the Hik-Connect account username.
    b. If login via phone number, please remember to insert 65 in front of your number. E.g : 6591234567

    Password: your own password

    After that, click Login

  12. Hik-Connect Login Interface

    You will see this small pop up window telling you that you have logged in and Click Close

  13. Hik-Connect New Device Adding

    Click the Online Device button on the right hand side, choose the device you wanted to add and it will appeared under Serial No column. Fill up the Verification Code which will be provided by your system vendor and Click "Add" to complete it.

  14. IVMS-4200 Client Homepage

    Click 01 to go Homepage; Click 02 to go Live View; Click 03 to go Playback

  15. Live View

    Click the device you added on the left side and drag to the channels list on the right hand side

  16. Playback

    Click the device you added on the left side > Select the date and time you want to view > Drag to the channels list on the right hand side to start viewing playback

Hik-Connect-logo-1

How to Use Hikvision Hik-Connect

How to Use Hikvision Hik-Connect App on iPhone & Android

Time needed: 5 minutes


Hik-Connect is a mobile phone surveillance application from HikVision, which is available on iPhone and Android phones, supporting Hikvision CCTV Camera, DVR, HD-TVI CCTV Camera, Alarm, Door Access Reader, IP Camera, NVR, etc. Hik-Connect is the newer generation of the mobile application after Hikvison iVMS-4500.

The below is the guide on how to use Hikvision Hik-Connect.

  1. Download the Mobile App

    For iPhone users, search for "Hik-Connect - for End user" from the iOS app store. For Android phone users, please go to Google Play Store and download the app (same name) and install it.

    After downloading is complete, click the app Hik-Connect to open it

    How to use Hikconnect 01

  2. Add the Hikvision Devices to Hik-Connect App

    In order to add Hikvision CCTV, IP Camera, Door Access Reader, or Alarm System etc to the mobile app, click the Login/Register button to start with.

    If you already have a Hik-Connect account, you can login accordingly now. If you don't have an account, you can register one here.


    How-to-use-Hik-Connect

  3. Add the Hikvision Device Now Using Serial Number (SN)

    Click the top right corner “+”. After that choose "Scan QR code" as shown below.

    We will use "Scan QR code" method which is most popular method to illustrate. You can find your QR code on the packaging box, the bottom of the NVR/DVR, or the side of the camera. You can also get the SN after you login to the devices.

    If you can't scan the QR code, you can also click the top right corner of the "pencil" icon to enter it manually.


    If you have successfully added the devices, you will see the SN appear as follows. Click "Add" to proceed.

    How-to-use-Hik-Connect

  4. Choose the right device type, and enter the device verification code


    You need to select the right device type and enter the device verification code, which was configured during the initial setup process.

    How-to-use-Hik-Connect

    How-to-use-Hik-Connect

  5. Add the Hikvision Device Now Using Domain Name

    Click the top right corner “+” and choose "Manual Adding" as your adding method.

    After clicking it, you will direct to this page and require you to change the Adding type from "Hik-Connect Domain" to "IP/Domain"

  6. Insert your IP/Domain details


    After you choose IP/Domain, it will show you the column where you need to fill up in order to add the device on your phone apps. (Please check with your vendor on the details you need)

  7. Watch the live view

    Once you done adding the device into Hik-Connect app, you will see this interface below. Just tap the device and you will be able to see the live view.

    How-to-use-Hik-Connect

  8. Useful Tips for Live View

    Here are useful tips when you watch the live view: 1) Resolution quality (toggle between the fluent mode and high resolution mode); 2) Digital zoom during live view; 3) Take a screenshot; 4) Record clip of video.

    If you have more than 1 camera, please choose the camera channel depends on the number of cameras you have in order to view all.

    How-to-use-Hik-Connect

  9. Playback the Video Records

    To view Playback records, go back to your main page of the apps. Tap the top left corner icon which is shown below.

    After that, choose the date and time you want to view the playback record. Choose the camera which you want to view the playback of it and click "Start Playback".

    How-to-use-Hik-Connect

    How-to-use-Hik-Connect

That is it! We have covered all the important usage of the Hikvision Hik-Connect mobile app in this tutorial. Feel free to play around with it. If you need any Hikvision CCTV, intercom, or door access, we would love to hear from you!

Dahua DMSS

How to Use Dahua DMSS Mobile App

Time needed: 5 minutes

Dahua DMSS is a mobile surveillance app with features such as remote monitoring, video playback, push notifications, device initialization, and remote configuration. Access controllers, alarm hubs, doorbells, NVRs, XVRs, VTOs, and NVRs can be added to the DMSS. Once you log into your account, you will be able to access cloud services such as cloud upgrade.

This guide will show you how to use Dahua DMSS on mobile phone, iOS and Android system.

  1. Download "DMSS" from the App Store

    For iPhones, go to the "App Store"; for Android Phones, please go to the "Google Play", and download the app: DMSS. These are the links: DMSS on App Store; &: DMSS on Google Play Store

  2. Open the DMSS App and Select the Country of Residence

    After downloading the app, click to open it. You will see the step that is asking you to choose the "Region". Please choose the country of your current residence. The purpose is to facilitate the P2P connection of Dahua's P2P connection. The country or area you choose can be changed later, so don't worry if you will move to other countries in the future.

    How-to-use-Dahua-DMSS-Mobile-App-01

  3. Add Dahua Devices on DMSS

    Referring to the image below, click the Top Right Corner to add new device.

    You now have a few options to add the Dahua device to the app: SN/ScanIP/Domain or Online Search. Choose the option that is suitable for your installation, or follows our or your device supplier's advice. If you have purchased the Dahua IP Camera, XVR, NVR, HDCVI Camera from us and not sure what to do, please contact us.


  4. If you choose to add the Dahua Device by "Manually Add/Bluetooth Search"

    Click "Manually Add/Bluetooth Search".

  5. Click "Decline" for the bluetooth scan.

    Click "Decline".


  6. Click "Cancel" for the location services.


    Click "Cancel".

  7. Choose your device type.


    Choose the right type of device (IP Camera, NVR or DVR/XVR) you have purchased.

  8. Add the Device Now


    Scan the QR code of the Dahua IP Camera, XVR or NVR (on the device itself, on the packaging box, or on the web interface). If you don't have the QR code, click "Manual Enter SN". Leave the security code option blank.

  9. Enter Details of the Dahua Device

    After that, please enter the device nameusername and passwordDevice name is up to you to decide.

    If you have purchased the Dahua IP Camera, XVR, NVR, HDCVI Camera from us and not sure what to do, please contact us. After you have entered all the required information correctly, click the Save icon on the top right to watch the live video footage.

  10. If you choose to add the Dahua Device by "IP/Domain"

    Refer to this step only if you have chosen to add via "IP/Domain". 

    Select the right device you are trying to add, and enter the information of Device Name, Address, User Name, PasswordDevice name is up to you to decide.

    You should have the information, or been given the information by your device supplier. Again, if you have purchased the Dahua IP Camera, XVR, NVR, HDCVI Camera from us and not sure what to do, please contact us. After you have entered all the required information correctly, click Start Live View to watch the live video footage.


    How-to-use-Dahua-DMSS-Mobile-App-06A

  11. Some Setting to Play Around under the DMSS Live View

    Referring the image below, clicking the icon circled will enable the switch between mainstream and substream - a way to switch between fluent transmission and clear image. You can also take screenshot, keep the video clips, or close the live view, etc.

    How-to-use-Dahua-DMSS-Mobile-App-08

  12. To Watch the Recorded Footage

    To replay the recorded video footage, go to the main menu of the app, click the Playback icon on the top left, as shown below.

    How-to-use-Dahua-DMSS-Mobile-App-09

    How-to-use-Dahua-DMSS-Mobile-App-10

  13. Choose a Few or All cameras to reply

    Upon clicking Playback, tap the top right corner to select the Dahua device of which you want to replay the video.

    How-to-use-Dahua-DMSS-Mobile-App-10-0A

  14. Select the Time and Date to Start the Playback

    After choosing the right camera, you need to select the date and time of the playback which you want to view. Once done selecting, click OK.

    How-to-use-Dahua-DMSS-Mobile-App-11

  15. Some Setting to Play Around under the DMSS Playback

    The playback video will start to play and you can fast forward, export or watch it in full screen mode as shown below.

    How-to-use-Dahua-DMSS-Mobile-App-12

That is it! We have covered all the basic usage of the Dahua DMSS mobile app in this tutorial. Feel free to play around with it. If you need any Dahua CCTV, intercom, or door access, we would love to hear from you!

If you want to change the Dahua CCTV camera password, follow this guide: how to change Dahua CCTV camera password on DMSS

How to Enable the Motion Detection (and with Email Alert Function) for CCTV

Keywords: CCTV, Security camera, motion detection, email alert

With our Safetrolley CCTV system, you can set the recording mode to “motion detection”, which means the CCTV security camera system will only record upon motion detected. With such function enabled, it can help to save the hard disk space the CCTV system consumes, and it will also make your life easier: because you won’t need to watch the no-motion video for a long time when you are replaying the video footage.

In addition, you can also enable the Email Alert function, which means whenever the motion is detected, the CCTV system will send you the email (with screenshots as attachment), to notify you that there is a motion detected at that time. Perhaps you should pay attention to your home/office at that time.

The below are the steps on how to enable the Motion Detection (and with Email Alert Function) for our SafeTrolley CCTV system:

1. Use the computer browser to login to the CCTV system. You should have been given the unique domain name, user ID and password to do so. Afer you login, go to “configuration” -> “Schedule Settings” -> “Edit”

2. At the “record type”, change it to “motion detection”. At the bottom of the page, choose the days you want to enable the function. Click “Copy” after you have selected the day. Remember to click “Ok” after that.

3. After you have clicked “OK” in the previous step, the color of the schedule should have changed to GREEN, which means “motion detection” schedule.

4. Go to “Motion Detection”. Make sure you tick the “Enable Motion Detection”. Click “Start Drawing” to select the area you want to detect motion. We advise you set the sensitivity to lower range, because you may not want to receive too many motion detection alert (via email). Remember to click “Save” after you have finished the settings.

Please click to view the image below for more details.

5. Choose the “Linkage Method”, and select “send email”. Click the picture to follow the selections. Regarding “trigger channel”, if your camera is the 1st one, choose “D1″; if your camera is the 2nd one, choose “D2″, so on and so forth.

6. Set the email alert settings. Refer to the below image for details. Gmail is advised, but please make sure you will register a new email box for the email alert function. This is quite important because it is possible that if the motion alert emails are sent too frequently, Gmail may ban the email account since it considers the email box is used to send spam emails. (unfortunately there is no way to overcome this issue since no service provider wants the user to flood other peoples mail box). So the best thing you can do is a) enable the motion detection only when you need to; b) make sure the sensitivity is set to low level; c) set the time interval as long as possible; d) restrict the motion detection areas to those you really need

7. All set! Please go in front of your camera and make sure everything is working well! If you still face issues after you carefully follow all the instructions, please user our remote support for assistance.

How to Configure iPhone/iPad/Android Phone/Android Pad to View CCTV Camera Video

NOTE: This tutorial may have been outdated. Please refer to the latest instructions here: How to use Hikvision iVMS-4500

After we have completed the installation of the security CCTV cameras for your home/office, you should be able to use your Computer/iPhone/iPad/Android phone to view the CCTV video footage in real time now. If you want to see the CCTV video using your iPhone/iPad/Android Phone/Android Pad, here are some steps you might need to go through:

1. Go the iOS App Store / Android Google Play. Search for “SafeTrolley CCTV“. It is our free App for our CCTV security camera users. Install it.

2. Click the App to open it. The picture is shown below.

3. Click the 3rd icon shown below to add the CCTV device.

4. Click the “+” icon as shown below.

5. Enter the configuration details (will be given by us)

6. Click the 1st icon as shown below, to go to the “Live View”

7. Click the icon as shown below.

8. Select the device, and click “Start the live view”.

9. The live view is here! To have a clearer view of the video, click “Clear”.

10. Double click the screen to enlarge to the full screen.

11. To replay the video, click the 2nd icon as shown below.

12. Click the icon as shown below to select the CCTV device.

13. Choose the CCTV device, select the start time & end time, and click “Start Playback”. You will be able to see the video footage in the past.

How to Use HikVision CCTV Software iVMS-4200 & Hik-Connect on PC (Updated in Jan 2019)

Keywords: CCTV Camera, Hikvision, IP Camera, NVR, DVR, iVMS-4200, Hik-Connect

Hikvision iVMS-4200 Version 2.xx. xx has been obsolete. Consider using the free version of new iVMS 4200 Version 3.x. Here is the guide on how to use new iVMS-4200.

These instructions are meant for use of iVMS-4200 (Version 2.xx.xx) on Laptop and Desktops which run Windows operating system. Mac users may also find the settings similar, but the interface may look slightly different. If you want to set the app on your mobile phone, please refer to the instructions of how to use iVMS-4500.

If you are using the Dahua DVR/XVR/NVR/IP Camera, please refer to the guide of How to Use Dahua SmartPSS on PC

For all the Hikvision CCTV devices (DVR/NVR/IP Cameras) you have purchased from SafeTrolley.com, you can easily view the live, or replay footage, change the settings, do the configurations online, using browsers, or our dedicated Content Management Software. Here is the instruction on how to set up the iVMS-4200 from Hikvision on your Laptop or Desktops which run Windows Operating system.

1. Download the Hikvision iVMS-4200 software here. If you are our customer, you should already be given the necessary information to start the configuration.

2. Install the iVMS-4200 by following the on screen steps.

3. After installing the software, double click to run the software. If you are asked to register an account to use the software, just do it. It is only for the software usage, has nothing to do the CCTV / DVR / NVR / IP Cameras itself. So any new user name and new password will be okay. You are advised to choose the “Auto Login” for your future convenience.

How to use HikVision iVMS-4200 and Hik-Connect on PC

4. Skip the Wizard by click “Cancel”.

5. Click “Device Management”

How to use HikVision iVMS-4200 and Hik-Connect on PC

6A. If you are using DDNS/static IP address.
Enter the information which we will give you, something like below. Click "Add" after all the information has been entered. You should be able see the serial number of the device shown up if all information is correct.

How to use HikVision iVMS-4200 and Hik-Connect on PC

6B. If you are using Hik-Connect.
Click "Add New Device Type" first. Then tick the option of "Cloud P2P Device" to enable it on the iVMS-4200.

How to use HikVision iVMS-4200 and Hik-Connect on PC

Now click "Cloud "P2P Device", choose your country of residence, and login by following the onscreen instructions. After that, you should be able to see the Hikvision devices you have added to you Hik-Connect account. (If you haven't done that, please refer to the instruction of: How to Use Hikvision Hik-Connect in iVMS-4500

How to use HikVision iVMS-4200 and Hik-Connect on PC

7. To watch the Live View, click "Control Panel", followed by “Main View”. After that, double click the DVR/NVR/IP Cameras you want to view, you should be able to watch the live views now

How to use HikVision iVMS-4200 and Hik-Connect on PC

8. To replay the video records, click "Control Panel", followed by “Remote Playback”. After that, choose the start & end time, double click the DVR/NVR/IP Cameras you want to replay the video records, you should be able to replay the video records now.

How to use HikVision iVMS-4200 and Hik-Connect on PC

9. If you want to change the password of the DVR/NVR/IP Camera, go to “Device Management”. Select the device, then click “Remote Configuration”.

How to use HikVision iVMS-4200 and Hik-Connect on PC

How to Use Hik-Connect on Mobile (iOS and Android) (Updated in Sep 2019)

If you are using Hikvision's CCTV camera systems, such as IP Camera, NVR, Turbo HD Cameras, etc, you are using either Hikvision iVMS-4500 or Hik-Connect app on your mobile phone.

This guide focuses on teaching you how to use the Hikvision devices on the Hik-Connect mobile app on iPhones and Android mobile phones. We are using iPhone as an illustration, the steps are similar on the Android phones.

If you want to find out how to access to Hikvion DVR/NVR/IP Camera from PC, please refer to How to Use Hikvision iVMS-4200 on PC

If you want to use Hikvision iVMS-4500 on iPhone and Android Phones, this is the step-by-step guide: How to Use iVMS-4500 on iOS and Android

If you are using Dahua's CCTV Camera systems, you will find this useful: How to Use Dahua iDMSS on iPhone & Dahua gDMSS on Android Phone

What is Hik-Connect

The Hik-connect app is from Hikvision, which is developed to connect Hikvision's IP Cameras, NVRs, Turbo DVRs, etc to your iOS and Android mobile Phones. It allows users to live view and replay Hikvision's devices remotely. In addition, with the latest update, you can choose either Hikvision's P2P or the IP/Domain to connect the Hikvision's devices in the Hik-Connect app. Instant push notification for motion detection is also available in the Hik-connect app.

How to Use Hik-Connect on Mobile for both iOS and Android?

1. Download the "Hik-Connect" app from the iOS app store or Google Play

How to Use Hik-Connect on Mobile (iOS and Android)

2. Open the app. Select the country of your residence

How to Use Hik-Connect on Mobile (iOS and Android)

3. Now you have two options: either login your Hik-Connect account, or add your device to the Hik-Connect App directly. Please approach your vendor if you don't know what to do. If you want to find out how to enable Hik-Connect service at your Hikvision DVR, NVR and IP Cameras, please refer to Step 2 of How to use Hik-Connect at Hikvision iVMS-4500

4A. If you are using Hik-Connect service, please "Login" as instructed on the app. You should be able to get access to the Hikvision devices after login.

How to Use Hik-Connect on Mobile (iOS and Android)

4B. If you are using domain name service, please click the "+" icon on the top right corner. Followed by "Manual Adding". The following tutorial will be mainly based on using the domain name service

How to Use Hik-Connect on Mobile (iOS and Android)

5. Select "IP/Domain". Enter the details as given by your vendor. After all the details have been entered, click the top right corner of the "Save" icon. Once you see the Camera No changes to the right number of cameras you have installed, that means the connection is successful. Click the "Start Live View" at the bottom.

How to Use Hik-Connect on Mobile (iOS and Android)

6. You can click the number icon of "1", "4", "9", "12", "16" to change the number of live views to watch at the same time.

How to Use Hik-Connect on Mobile (iOS and Android)

7. You can click the "SD" icon to change between the clear view and the fluent view.

How to Use Hik-Connect on Mobile (iOS and Android)

8. To watch the recorded video, click the top left icon as shown below.

How to Use Hik-Connect on Mobile (iOS and Android)

9. Select the Playback DatePlayback Time and the camera you want to watch the playback records. Click "Start Playback" after that.

How to Use Hik-Connect on Mobile (iOS and Android)

Summary on Use of Hik-Connect on Mobile (iPhone & Android)

The Hik-Connect app is intuitive, light-weight and easy-to-use. You can play around with the app, what you do on the Hik-Connect app will not affect the Hikvision CCTV Camera you installed. If you still face any issues with Hik-Connect and your Hikvision CCTV Cameras were installed from us, please contact us for support.

Want to install Dahua or Hikvision IP Camera, HDCVI, HD-TVI CCTV Camera for your home or office? Browse various types of IP Camera & HD-TVI CCTV Camera packages!

Quick Contact

CCTV Camera Promotion

Ready to Get Started? Contact us Now!

Send us a quotation request. We will get back to you within a few working hours.

+65-63279051

+65-81685916

support@safetrolley.com

60 Albert Street, #09-05, Singapore 189969

Technical Support | Remote Support | DownloadHikvision Hik-Connect | Hik-Connect Team | Hikvision ivms-4200 | Dahua DMSS | Dahua iDMSS/gDMSS | Dahua SmartPSS | Resources | CCTV Storage Calculator | Share Device on Hik-Connect with Installer | Share Device on Hik-Connect with User | PayNow Payment | Video surveillance system (VSS) for construction | PPE Detection

IP camera is the most reliable and accessible invention for foolproof security. Due to this invention, the surveillance system has become more reliable and secure. This technology has enabled you to connect the CCTV camera to the network. Now you can view the CCTV camera videos through a network from any location. IP camera Singapore also allows you to record the video on network drive. In many cases, it has been noticed that the burglars took away the DVR after attempting criminal act. Even installing the CCTV camera Singapore, the homeowner could not be able to identify the culprits. The recording of the evidence could not made available too. In fact, the surveillance system was itself on the risk of theft. IP camera surveillance system has enhanced the security because now your video is safe on the network.

The invention of IP camera has opened lots of options for the homeowners to monitor their home remotely. Now everything happening at home is directly on the watch. Similarly, the business community is more beneficiary of this wonderful invention. The safety of the recording and accessibility options has increased the demand of IP camera in Singapore. CCTV Singapore industry is focusing more on IP camera because it is more secured way of recording the evidence. With the installation of IP camera surveillance system, you can have complete piece of mind. You have best reliable security system, which never fails to produce evidence.

Hikvision & Dahua are the world’s leading CCTV camera, IP Camera and Video Surveillance Equipment companies. HikVision and Dahua specializes in video surveillance products and technology, HikVision & Dahua designs and manufactures CCTV and video surveillance products. HikVision & Dahua has products ranging from CCTV camera, IP cameras, HD-TVI cameras, NVRs and DVRs to video management software.

A reliable and secure safe box is the basic requirement of every home and office. Everyone needs a safe and secure place to keep his/her valuables and personal belongings. You need a safe box to lock and safeguard your confidential documents, which you do not want to share with other. Even, there may be some special documents or belongings you won’t want to share with your family members. The protection against unauthorized access to the personal assets and documents is the basic aim for having a reliable and secure safe box. Safety of the precious, personal, and secret assets remained the problems of human being in every era. In every era, the efforts to make a secure and foolproof safe box were made by the experts. During the current technology era, having a secure safe box is also the basic priority of everyone. The latest technology is being used for manufacturing secure safe box. Singapore lock and safe box are well known all around the world due to reliability and safety. The safe deposit box Singapore is focusing more on the quality and features of the safe. The basic aim is to make the safe more secure and complicated to prevent unauthorized access.

All possible measures have been taken to restrict unauthorized access to the safe box. Currently, key safe box, electronic/digital safe box and multi-lock system safe box have been introduced in the market. The advancement of technology has unveiled multiple options for the safe box manufacturer Singapore to make high-quality safe box and safe chest products. Brands of safe box includes Yale safeSentry SafeDiplomat Safe, Nika Safe, LuCell Safe.

server rack is a structure consisting of vertical columns and horizontal shelves that form a frame. This frame works as a special support for different kinds of computerized systems with special requirements. Server racks offer an excellent solution when it comes to find an optimal distribution, space saving and efficiency.

Keywords: HikVision, Dahua, CCTV Camera, IP Camera, wireless IP camera, CCTV SingaporeCCTV installation Singapore, HD-TVI CCTV camera from Hikvision, HDCVI CCTV Camera from Dahua, Nanny Camera, DVR, NVR, Digital Door Lock, Home Safe Box, Cloze Passage, Office Access Control, Yale Digital Lock, Fingerprint Lock, Digital Safe, Yale safe boxServer Rack

Copyright 2009-2025 SafeTrolley.com. Owned by Wise Group Pte Ltd. All Rights Reserved. CCTV Camera and IP Camera in Singapore. Buy Safe Box in Singapore. Server Rack Singapore. Access Card Duplicate. HikCentral Professional License